Galaxy Nexus phone comes with a lot of different firmware variants which are updated by Samsung except three which are maintained by Google. If you are fortunate to get a Nexus phone with Google maintained firmware, you will receive updates over the air (OTA) as soon as new releases are made. Samsung releases are usually delayed and will end up in long and frustrated waiting. My phone had a Samsung variant of Icecream Sandwich (4.0.2). However, one need not be frustrated about it, we can unlock the bootloader, update to Google maintained firmware and lock the bootloader when completed.
Different Variants
Given below is a list of firmware variants currently in use in different countries, carriers and different models of the phone.
GSM/HSPA+ Models
takju— US region and carrier-independent firmware released on models sold in the US through the Google Play Storeyakju— International region and carrier-independent firmware released on models sold throughout western Europe.yakjudv— Variant for Australiayakjujp— Variant for the Middle Eastyakjukr— Variant for South Koreayakjusc— Variant for Japanyakjuux— Variant for Canadayakjuvs— Variant for Brazilyakjuxe— Variant for Russia and the former Eastern Blocyakjuxw— Variant for certain carriers in Western Europeyakjuzs— Variant for China and Hong Kong
CDMA/LTE Models
mysid— Variant for Verizon in the USmysidspr— Variant for Sprint in the US
Firmware Updated by Google
Google updates the following firmware variants:
takjuyakjumysid
How I Did
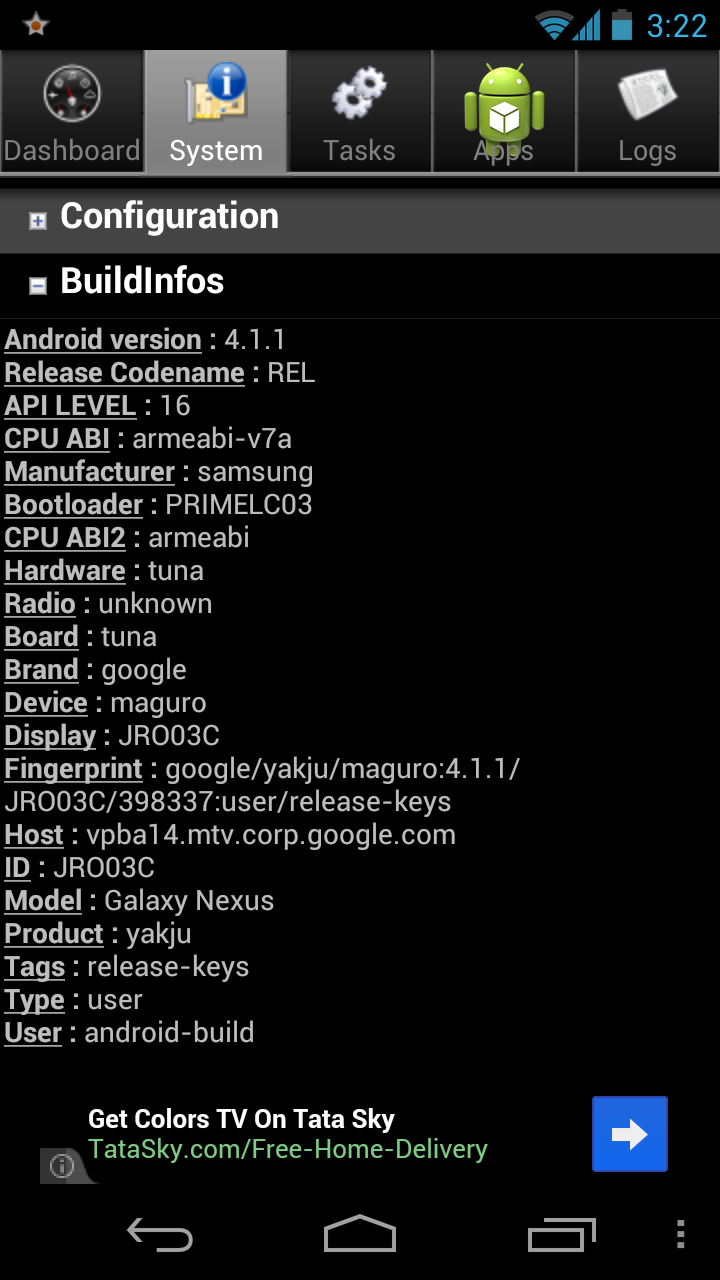
My phone had a firmware variant, yakjuxw which was meant for certain carriers in Western Europe and not updated by Google. The simple way to find the phone’s firmware is to install Android System Info from Google Play onto the phone, launch the application, go to System > BuildInfos which will provide a screen like the one in the screen shot.
Look for Product (fourth line from bottom of the list) which tells you the firmware installed. In my case, it shows yakju, since I took the screen shot after upgrading to Jelly Bean.
We need two binaries namely fastboot and adb which can be downloaded from here for Linux and Windows; and from here for Mac OS X. I compiled the binaries in my Linux box from sources downloaded from here. fastboot is to communicate with the phone from computer when the phone is in fastboot mode while adb is to do the same when the phone is in normal mode.
Next step is to download factory images yakju of Galaxy Nexus from Google.
Here goes the step by step upgrade process.
Unzip the archive for IMM761 which will explode by creating a directory, yakju-imm76i. Change working directory to yakju.imm76i. Unzip the zip archive, image-yakju-imm76i.zip (there will be a zip archive by this name inside the tarball) which will provide, boot.img, recovery.img, system.img, userdata.img and android-info.txt. Connect the Galaxy Nexus phone to the computer through USB. Issue the following commands from the prompt:
adb devices(This will check if the device is connected. You will see complex alpha-numeric product code.)adb reboot-bootloader(reboots your device into fastboot mode.)fastboot devices(same asadb devices)fastboot oem unlockfastboot flash bootloader bootloader-maguro-primela03.img(file name may change depending upon the ROM.)
ROM.)fastboot reboot-bootloaderfastboot flash system system.imgfastboot flash userdata userdata.imgfastboot flash boot boot.imgfastboot flash recovery recovery.imgfastboot erase cachefastboot reboot
If you have completed all the above steps, you have upgraded the ROM to Google-maintained yakju version 4.0.4. Similarly, repeat the same steps for JRO03C. Once done, you will find your phone rebooting to Jelly Bean.
You can lock the bootloader again if you want by issuing the command:
fastboot oem lock
before rebooting the device with fastboot reboot.


Hi Thanks for sharing this useful info.
If you can you me the step by step processes with screenshots it will be better.
Is this method will work for the US “takju” gxlaay Nexus (currently available on the Google Play store for US customers)? I am asking this because your model seems to the International version AKA “yakju” Galaxy Nexus.
Thanks for this. I simply could not wait for Samsung, so I decided to loose all my data and use your instructions. I was on 4.04 Samsung and flashed to 4.04 Google. I thought, that it would be best to let it upgrade itself and it did so after 2 minutes so now my Galaxy Nexus is running Jelly Bean and there were no problems.
I’m entirely linux and did not have to download any drivers – it simply worked like a charm.
Which linux you have used? Ubuntu?
Ubuntu 12.04.
Great, as you’ve told, one can stop at 4.0.4 and wait for OTA update which will happen in a few minutes. But I was too impatient that I flashed the Jelly Bean image as well.
Yes, I too am in Linux since 1995 and have never ever used Windows for personal or professional computing.
Thanks for the great tutorial. Just a conemmt and a question. My phone has recently run into some serious lag issues which I couldn’t troubleshoot. The problems were so bad that couldn’t get the driver to work on my phone (I tried the Samsung link and even installed PDAnet). My wife’s Galaxy Nexus connected fine. The only solution I was able to find was to perform a hard reset. After re-booting, the phone connected fine. I followed the instructions just fine thru step 12 but couldn’t get into the ClockworkMod Recovery (I got an android laying down with a red exclamation mark). The only mistake I made up until that point is that in step 8, I initially flashbooted the GSM img. Before rebooting (step 9), I simply used entered in the flashboot command for the verizon image. Could this be my problem? I ended up doing another factory wipe (samsung’s hard reset) which didn’t fix the issue. I even tried to delete /system/reboot-from-recovery.p using ES File Explorer (enabling up to root browsing) but the program wouldn’t let me. Any suggestions on what to try next? The only other think I could think of was to install Clockwork Mod and Flash CWM Recovery from the program. However doing this produced the CWM error An error occurred while attempting to run privileged commands! . Any help or suggestions would be very much appreciated at this point. Thanks.
Thanks so much, this worked perfectly. Just a couple of points:
1) Perhaps note that users will lose all their personal information and should back up their data before updating their phone.
2) 6. “adb reboot-bootloader” should actually be “adb reboot bootloader”
Sorry, I should have done that. Had the impression that people who dare to upgrade their phones are aware of this fact.
Hey why can’t I just flash the galaxynexusunroot404 with cwm.. I’m hainvg trouble with my drivers.. I keep trying to install them on my xp comp and they just dont show up when i try to update adnroid1.0.. What am i doing wrong i tried everything to get samsung drivers to work on this pc.. again i have xp im pretty sure that has a big part with my problem..
Both are correct, see the output of
adb --help:... adb get-state - prints: offline | bootloader | device adb get-serialno - prints: <serial-number> adb reboot [bootloader|recovery] - reboots the device, optionally into the bootloader or recovery program adb reboot-bootloader - reboots the device into the bootloader ...Great walk-thru. I figured it must be something simple like this, yet there seems to be a total death of information on exactly what the steps are. Everyone else directs us to install buggy USB drivers on windows machines and then run “toolkits” and whatnot.
I don’t have a Windows machine, so it’s really good to see this in a platform agnostic (Linux!) checklist form. I just wish you’d add an optional step for “rooting” the handset after all of the upgrades.
Thanks
Many thanks for your nice compliments, Mark.
I don’t know how to root the handset, nor have ever attempted, for, I didn’t need to have my phone rooted till now. Is there any specific advantage of rooting? I think, some sound applications make use of it. Also, for me as a TeX guy, I can install TeX on the phone and play with it, but, it does not attract me much. Waiting for my Nexus 7 tablet to arrive, I will make a try there.
Hi, I can’t seem to find the ‘prompt’ you’re referring to once I connect my Galaxy Nexus. Where do I type in the commands?
Seems like, you are a Windows user. I am sorry, it might look strange, but is a reality that I don’t know anything about Windows. If you are in Linux, you can simply open a terminal and you can enter the commands one after another as given in the post at the “prompt” in the terminal.
My android version is Version 4.0.4 (IMM76K) and my galaxy nexus is of yakjujp variant. Whether IMM761 link given here for the android 4.0.4 work for mine?
Hi,
Thanks for the wonderful post, I was worried of not receiving the updates for my Nexus (bought from Middle East region,
yakjujpwith Android 4.0.4). Before starting with the steps could you clarify me the same doubt (as post above). Same as the person above, I’m currently on Android version 4.0.4 (IMM76K), is it possible for me to go with IMM761?Cheers!!
hello, sorry for my question, answer only if it s easy for you. thx 😉
can i load this ROM for my graphic tablet ST8002 :
SDK version: 4.0.4 / ID: IMM761 / Linux / 3.0.8-gal f4c93 Dalvik VM version: 1.6.0
Amlogic Meson6 g26d customer platform Revision: 0 / Name: ARMv7 Processor rev 0 (v70
1512 MHz / Cores: 2 / Amlogic Meson6 g26d customer platform Revision: 0
1024×720 DPI: 160×160 Refresh rate: 60 Hz / GPU (OpenGL) Vendor: ARM
Renderer: Mali-400 MP Version: OpenGL ES 2.0 / MMA 3-axis Accelerometer